Tapered hole measurement – replacing bluing gauges with fiber-based optical 3D metrology
Published on May 12, 2021
Measuring tapered holes is a preoccupation in many high-precision industries. One traditional approach for inspecting tapered holes involves the use of bluing plug gauges.
This article briefly describes the bluing process and then looks at an alternative approach for tapered hole inspection – one that is more automation-friendly and that provides high-precision measurements that go way beyond GO/NO-GO capability.
What is the bluing process?
The bluing (or blue check) process checks the contact area between a male master taper a tapered hole, which is considered the female part of a mating taper fit.
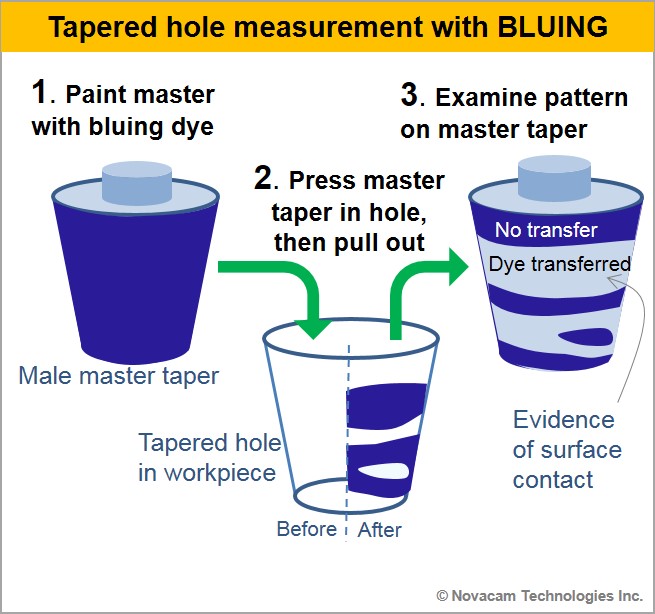
How bluing works in 3 steps
- A male master taper is covered with a thin coat of Engineer’s blue (Prussian blue pigment mixed with oil).
- The male master taper is pressed into the tapered hole.
- The master taper is withdrawn and inspected for indications of too much or too little taper and for indications of defects or out-of-roundness.
GO/NO-GO decision: In areas where the master taper and the tapered hole surfaces came in contact, the blue ink is fully or partially transferred to the inside diameter (ID) of the hole. The estimated percentage of ink that transferred indicates how true to form the tapered bore is. Operators need considerable experience to be able to estimate the percent contact of the surfaces and judge whether the contact is adequate (e.g., 80% or 90% contact may be required for a GO answer).
Example application: blue pins for inspection of tapered drill holes in assembly
Blue pins are small bluing gauges used to inspect tapered holes just several mm in diameter.
In some high-precision assembly plants, blue pins are used to inspect the quality of tapered holes that are drilled and reamed to accommodate specialty bolts (e.g., tapered shank bolts). In such holes, blue pins help identify defects such as out-of-round ID, cracks, burrs, gaps between drilled layers, or the approximate percentage of bearing surface.
How well does bluing work?
The bluing process provides a GO/NO-GO answer for tapered hole inspection. It is used when the general fit of the male taper into the tapered hole matters but if exact measurements are not important.
The answer to “How well does bluing works?” depends on the context. Here are some benefits and shortcomings of the bluing method, which remains useful and relevant for taper hole inspection in small-volume operations:
- Benefits of bluing process: Simple GO/NO-GO; economical in terms of equipment for small volume operations
- Disadvantages: Manual technique; slow and labour-intensive; gives no quantitative measurement; evaluation is subjective – operator experience and technique affect the coverage estimation.
Beyond GO/NO-GO what other aspects of tapered holes can be useful to measure?
Many high-precision part manufacturers require more detailed and precise measurements than those available with the bluing method.
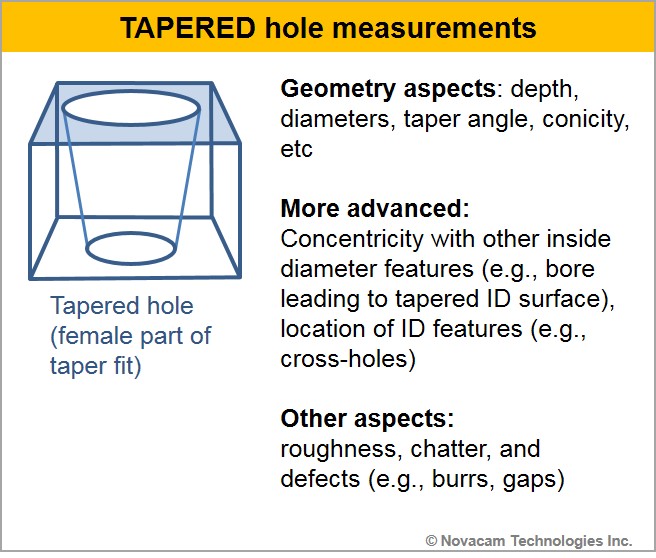
- A good start are GD&T (geometric dimensioning and tolerancing) parameters such as diameter measurements, taper angle, depth and conicity.
- More advanced parameters can include location and geometry of inner features (e.g. cross-holes) or concentricity of the tapered hole with respect to a bore that leads to it.
- Other aspects that can be measured are taper ID roughness, chatter, or defects such as gaps, burrs or cracks.
Extra demands of more advanced manufacture facilities
Requirements for tapered hole inspection also increasingly include empirical (rather than subjective) measurements and automation of tapered hole measurements. For instance, high-precision assembly lines with robotized drill-and-fill fastening processes often require:
- Fully automated GO/NO-GO inspection of drilled fastener holes
- Precise and quantified hole ID and countersink measurements for analysis and logging
- Rapid measurement analysis that can be fed back into the quality control process loop.
For these kinds of requirements, manufacturers look for more advanced measurement approaches. And NOVACAM optical metrology systems often fit the bill.
Optical fiber-based system for taper hole measurement
Novacam offers three non-contact 3D measurement systems for tapered hole measurement: the BOREINSPECT system, the TUBEINSPECT system and the SURFACEINSPECT system. All three are optical and fiber-based and offer manufacturers an advanced set of capabilities for tapered hole measurement. The choice of system depends on the application.
In this article, we look at the BOREINSPECT system, which would be the system of choice for the above example of measuring tapered holes in robot drill-and-fill applications.
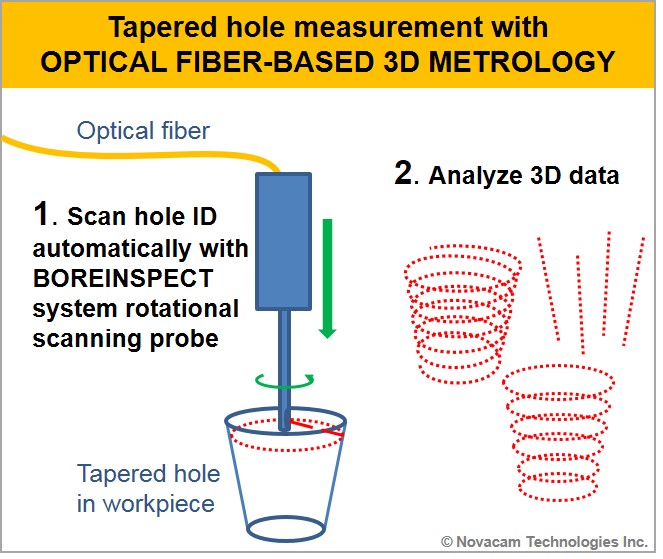
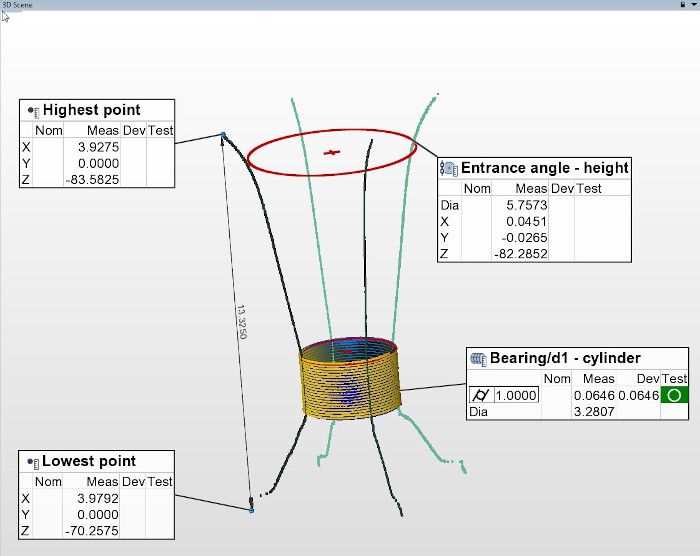
The BOREINSPECT system uses a rotational scanning probe to easily reach inside each tapered hole to acquire its ID. As illustrated, scanning is done in a point-by-point manner (at a rate of up to 100,000 3D points per second). Scan pathways can be linear, circular, spiral, or a combination thereof.
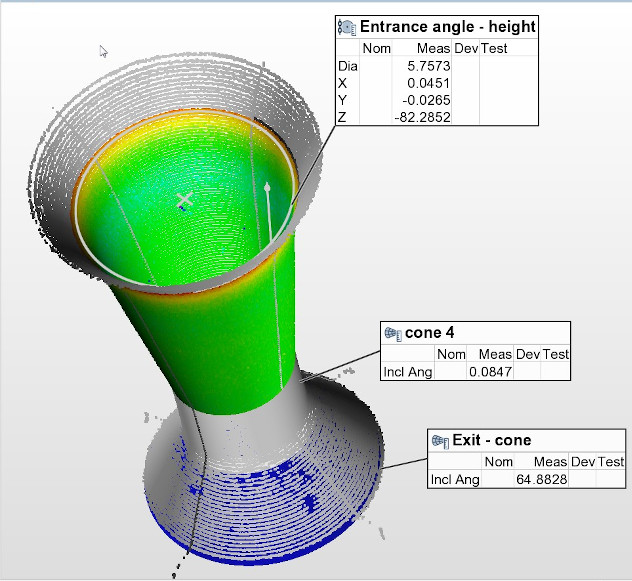
Once the 3D point cloud is acquired, an industry standard metrology software (PolyWorksTM Inspector) is used to obtain the required tapered hole measurements.
The design of the BOREINSPECT system probe enables measurements in almost any plant environment:
- The small and fiber-based probe can be integrated with precision stages, robots or gantries.
- As an end-effector on a robot head, the probe alternates with drill end-effectors, and provides ID measurements regardless of hole location or orientation.
- The probe measurement is immune to ambient lighting and air perturbation. The probes can measure even in hostile environments, featuring extreme temperatures, pressures, or with radiation.
The hole ID measurements are typically forwarded to process control software, so that real-time feedback is provided on drilling, grinding, or other tapered hole machining processes.
Benefits of BOREINSPECT system for taper hole inspection
The BOREINSPECT system provides many benefits:
- Micron-precision of measurement
- Non-contact measurement – no consumables or stoppages to change probes
- Versatile installation & integration options for fully automated measurement of tapered and other holes. Blind holes and hard-to-reach holes included.
- 100 kHz scanning speed to enable 100% inspection
- Capabilities to provide quick visual comparison (deviation map) of the acquired ID measurements to pre-specified tolerances or to the CAD of the part
- Wide range of measurements in addition to GO/NO-GO, with the same probe:
- Geometry: Diameters of the taper hole, taper angle, depth of hole, conicity, axial straightness, ovality, etc.
- Location of internal features
- Concentricity with other features (e.g., bore leading to tapered chamfer)
- Defects (e.g., burrs, patterns of rifling from drill bit, cracks, etc.)
- Waviness and roughness (axial or circumferential)
- Chatter.
What about taper hole measurement in other industries?
Each machining and inspection process is unique. For micron-precision tapered hole measurements, Novacam provides 3D metrology solutions in:
- Aerospace: aircraft fastener holes
- Automotive: tapered engine shaft couplings, pitman arms, taper bushings, nozzle seats in fuel injectors, raceways of tapered roller or ball bearings
- Die and Mold measurements – high-precision dies with tapered holes, wire-drawing dies, mold cavities
- Medical instrumentation: orthopedic device tapers
- Nuclear: reactor tubing
- and more.
Do you need to measure tapered holes?
We are happy to discuss your particular application!

