Thickness
High-precision non-contact thickness measurements
NOVACAMTM 3D metrology systems deliver fast and reliable non-contact thickness measurements of transparent and semi-transparent materials. They offer:
- Precision better than 1 µm
- Thickness measurements of thin films, single-layer films, or multi-layer films
- Films and film stacks: from 10 µm to several mm thick. The systems simultaneously measure the thickness of all substrates (including air gaps) within a film stack
- High-speed scanning: acquisition of 2,100 to 100,000 points (profiles) per second
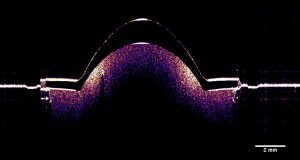
- Data acquired for automated reporting or visualization: depth profiles, 2D cross-sections (B-scans) and 3D volumetric images (C-scans)
Materials measured may be reflective or nonreflective, smooth or rough, stationary or moving. Index of refraction (IR) can also be calculated if needed. Surface or sub-surface roughness, shape or topography may be acquired at the same time as thickness. See more on what we can measure.
Advantages of system design that is modular & fiber-based
NOVACAM systems are modular and fiber based, meaning that the scanning optical probes are connected to the system interferometer with an optical fiber that can be several meters long. Thanks to the unique combination of Low-coherence Interferometry technology and fiber-based design, the systems offer significant advantages to our clients. These advantages include:
- Configuration versatility for both in-process and benchtop inspection
- Support for automation
- Ability to acquire long profiles
- Ability to measure inside small-diameter tubes, bores, etc. See inspection in hard-to-reach spaces
- Ability to measure surfaces with steps, grooves, channels, holes, and other high-aspect-ratio features
- Ability to scan surfaces that are reflective or nonreflective, smooth or rough, stationary or moving
- Ability to measure GD&T even in extreme temperatures or in radiation. See inspection in hostile environments.
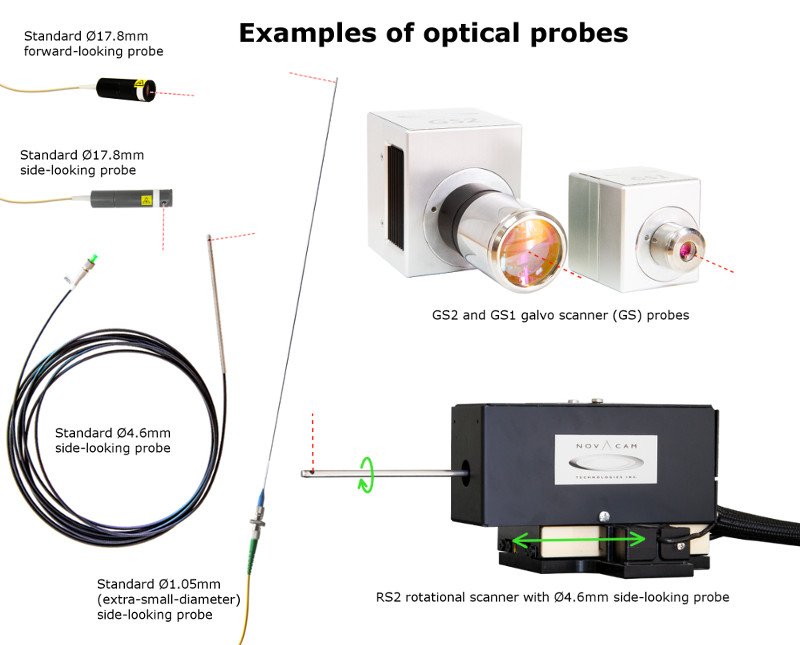
NOVACAM probes come in many designs and models, which include standard or small-diameter probes, as well as rotational scanners and galvo scanners – to satisfy the majority of high-precision inspection applications.
Multi-layer thickness measurement of high-grade tubing
High-grade polymer tubing must be closely monitored during extrusion so that dimensions continuously adhere to tight specifications.
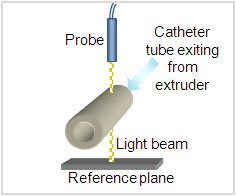
To monitor the quality of extruded medical catheter tubing (diameter < 1.5 mm), a NOVACAM optical probe was installed at the extruder exit (see diagram). With this setup, cross-section dimensions are acquired continuously and an efficient production control loop is established:
- The probe acquires the thickness of the advancing thin tubing as a long profile – at up to 100,000 points (A-scans) per second
- Each A-scan delivers optical thickness of the upper wall, the enclosed air space, and the lower wall
- Application software transforms optical data into physical dimensions of the tubing. The table below the diagram shows the tubing dimensions as well as the index of refraction (IR) calculated from a single A-scan
- Cross-section dimensional data is streamed to process-control software which adjusts extruder parameters in real time.
Real-time continuous inspection cuts down on extruder down-time, reduces material waste, and lowers overall production costs.
| Tube dimensions and IR | Value |
|---|---|
| thickness of upper wall | 0.131 mm |
| thickness of lower wall | 0.162 mm |
| inner diameter | 0.852 mm |
| outer diameter | 1.145 mm |
| calculated index of refraction | IR = 1.512 |
Probe multiplexing for additional ROI
Several fiber-based probes can be multiplexed to a single detector (MICROCAM interferometer) for simultaneous thickness measurements on different aspects of a production line.
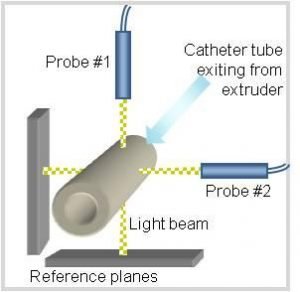
For example, the tube inspection setup above can be extended by adding a second probe at the extruder exit (diagram on the right). In this way, the operator is able to monitor tube dimensions along two axes continuously, achieving even greater quality control with minimal extra investment.
Multiplexing two probes to one interferometer has also been used in the example below.
Continuous measurement of optical fiber and its coatings
A NOVACAM thickness measurement system has been used in the production of optical fibers for several years.
In this particular setup (photos on the right), two scanning optical probes (multiplexed to a single interferometer) are positioned at right angles to each other and to the continuously moving optical fiber. The fiber has two layers of semi-transparent coating whose thickness must remain uniform.
The video below shows the user display of real time measurements, which are forwarded to the application software and logged as per user requirements. As part of production quality control, the cross-section data (shown as red for fiber, blue and green for the two coating layers) is programmatically compared to user-specified criteria.
Thickness measurement applications across industries
NOVACAM 3D metrology systems acquire thicknesses in a range of domains:
- Opthalmology: inspection of contact lenses and intraocular lenses (IOLs)
- Semi-conductors: coating on MEMS devices, semiconductors, wafers, hybrid circuits, fuel and solar cells
- Aviation and automotive: protective films
- Optical: etching and deposition thickness on waveguides
- Electronics: thick film photoresist coating on electronic wafers
- Bio-medical: coatings which protect devices from corrosion or patients from complications
- Others: conformal coating, protective tool coating, vacuum coating
Related links
Download application note “Multi-Layer Thickness Measurement with Low-coherence Interferometry” [4 pages, PDF, 0.8 MB] for more details on this application
Contact us or request free sample analysis to see if NOVACAM 3D metrology systems are suitable for your thickness measurement application


